On this page
Supported File Types
UNE for ArcGIS supports upload of various file formats.
The ability to upload a file to UNE applications can be configured within the Builder in Custom panels under the Form Command types. Use the Type of file dropdown to support the upload of different file types. The supported formats are:
- CSV
- CSV (Auto generated)
- Shapefile
- GeoJSON
- GPX
Example Workflow
An example workflow to upload/download CSV’s to/from applications could be:
- Create a Custom panel with a Command Form
- Add a Form parameter variable and set to File

- Set the file type to CSV

- For CSV files, it is necessary to map fields using the Add file field option.

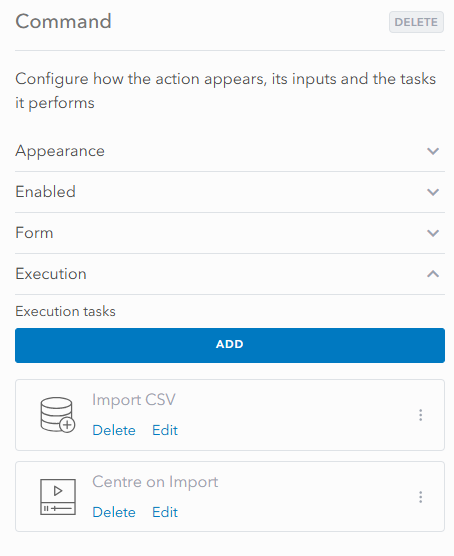
- Execution tasks can be setup in the Command panel to perform actions upon uploading of a file. For example, it is possible to take an imported CSV file and convert it into a FeatureSet with the following Arcade script.

// Take the file import from the Command Form var source = $action.csvfile // Convert the data file into a FeatureSet using the csvtolayer function // Need to state what the fields are we are expecting to see and that the spatial reference of the CSV is 4326. // It will automatically get projected to the map's spatial reference var myfeatureset = csvtolayer(source.data, [ { "name": "name", "type": "string", "sourcename": source.fields.name } ], { type: "point", "xfield": source.fields.X, "yfield": source.fields.Y, spatialReference: { wkid: 4326 } }); // Now build up an array of features to insert var feats = []; var mp = []; var g = null; for (var feat in myfeatureset) { g = geometry(feat); if (g != null) { push(mp, geometry(feat)); push(feats, Feature(geometry(feat), { "Name": feat.Name })); } } // For convenience, create a multipoint of all the points // to get the extent. We will use this to zoom to the extent if (count(mp) > 0) { var allpts = MultiPoint({ points: mp, spatialReference: mp[0].spatialReference }); // Use the state function to store this extent, just for the duration // of the operation. We will use this in the next task to // zoom to the extent state("lastimportextent", extent(allpts), { "type": "operation" }); } else { state("lastimportextent", null, { "type": "operation" }); } // Return the array to insert return feats - To centre the map on the imported features, one could create another Execution task with the Run Actions option with the following script noting that the order of Execution tasks in the Command panel needs to be followed.
- To export a CSV, a separate Command Button could be configured with a Run Actions execution task using the following Arcade script:
/** Download a CSV item from a FeatureSet. */ var layer = FeatureSetByName($map, "Somepoints"); // Build header row var output_header = "OBJECTID,Name,X,Y\n"; // Loop through features for (var f in layer) { var g = Geometry(f); output_header += f.OBJECTID + "," + f.Name + "," + g.x + "," + g.y + "\n"; } // Export CSV { command: "export-csv", csv: output_header }
// Pan to a Location

// Look up the last imported extent
// This will only exist as state for the execution of the command
var lastimport = state("lastimportextent");
if (lastimport == null || lastimport == "") {
    return [];
}

// Get the center
var pt = centroid(lastimport);

// Zoom to an extent around the imported data
return {
  command: "zoomto",
  geometry: Extent({
    xmin: pt.x - 500,
    ymin: pt.y - 500,
    xmax: pt.x + 500,
    ymax: pt.y + 500,
    spatialReference: pt.spatialReference
  })
};